Aquascapes and planted tanks are extremely rewarding if done right. But finding the balance for a thriving planted tank could be tricky, specially for beginners. Many people suffer with finding the right balance in their planted tanks and as a result they grow more algae than actual plants.
Sounds familiar? Well, been there, done that!
In this article I will try to help you to find this balance methodically with ease. I will also share few of the tips and tricks that I learned from experience and experiment.
In this article I will cover –
- The Three Pillars (key elements) of a successful planted aquarium
- How to adjust the amount of these three key elements (CO2, fertilizers & Light)
- Finding the balance and harmony between these three
- Some trusted and tested techniques to achieve a thriving planted tank
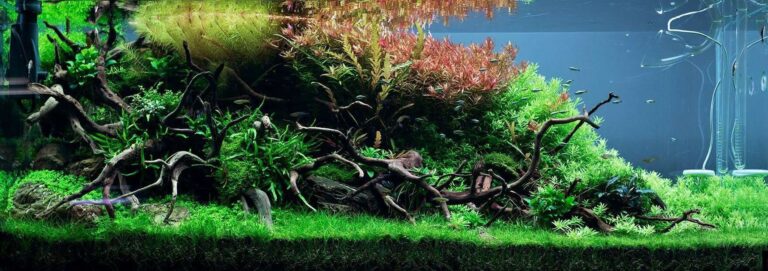
Before jumping into the details, let me share a stunning aquascape by Josh Sim that ranked number 2 in the IIAC 2019 competition. Just for your motivation –
![]()
So What Are The Three Key Elements For A Planted Aquarium?
You will find so many things in the planted tank journey and don’t get me wrong – they all have some purpose and benefits. But we are talking about the pillars of a planted tank. Here are the 3 key elements to achieve a thriving ecosystem –
- Carbon dioxide (CO2)
- Fertilizers
- Light
We need to find a balance among these three things. Let me say it loud and clear, CO2 is the No.1 priority in a planted tank, then fertilizers and lastly lights. And you need to find the right balance for your tank for all these three items.
There are no universal rules here. Just because you and I may have the exact same size tank, that will never mean that both our CO2, fertilizers and light requirements are the same. And tuning these three items individually is a hell of a task for anyone.
So, here is what I do and advise:

Share this Image On Your Site
1. CO2 (Carbon dioxide):
First and most importantly, turn up your CO2 as high as possible. For pressurized CO2 owners, you have two options:
Option 1: Start with a reasonable bps (bubble per second) of CO2 and increase by 1 bps daily until u see the fish gasping, then turn it down 1 bps. That is your optimum CO2 levels (around 30-35 ppm). You will need a bubble counter to measure bps.
If you have a pH test kit or a pH pen, first measure the pH of your tap water and then increase CO2 until you have 1 pH drop. for example, if your tap water (supply water) pH is 7.3, increase CO2 until tank pH is 6.3. this 1pH drop ensures 30-35ppm CO2.
Option 2: For DIY CO2 users, you cannot use the fish gasping method, because doesn’t matter how much CO2 you give, with DIY CO2 you can never exceed 14-15ppm (and also in a tank less than 30g).
So, for you guys, using a pH test kit or a pH pen is the only option, and you should target for a 0.5 pH drop. For example, if your tap water pH is 7.3, then you should aim for a pH of 6.7-6.9 in your tank.
FYI, it doesn’t matter if you are using sugar-yeast or acid-soda method, CO2 is CO2. The different method just affects the longevity of the mixture.
2. Fertilizers:
Now that you have ensured that you have adequate CO2 in the tank, it’s time for fertilizers. That is where EI dosing comes into play.
With EI Dosing, you are ensuring that you have enough of all the macro and micro nutrients in the tank, so that there is never a nutrient deficiency in the tank. If you do not have access to EI fertilizers, then use whatever fertilizers you have access to. Most fertilizers are made of the same ingredients – the only difference is how much of what is in it.
Unfortunately, no fertilizers (except Seachem Flourish) mentions how much of which nutrient they have in it. So you pretty much have to go in blindly, which is something I really hate.
If you are not using EI fertilizers, I would recommend that you use double the dose of what is mentioned on the bottle (especially if you are using garden soil, as it has very less nutrients compared to commercial soil). For example, if your brand of fertilizer recommends to use 5ml per 10 gallons, 2-3 times per week, then you should use it 10ml per 10g, 2-3x per week, as most of these commercial fertilizers have very less amount of each of the macro and micro nutrients.
Also, you must ensure 50-70% water change weekly. So, in the above example, you should dose fertilizers on Sunday, Tuesday and Thursday, and then do a 50-70% water change on Next Sunday and start dosing again.
3. Light:
Now that you have made sure that there won’t be any deficiency of CO2 and fertilizers, the only thing you need to tune is light. I cannot emphasize this hard enough, but light is the LEAST important among these three items. Meaning, CO2 and nutrients are much more important for a planted tank than lights.
As for lights, there is also no universal formula, but rather a rough guideline with the “Watt-per-gallon” rule. But that is also vague and should be used only as a guideline. Also, note that the watt per gallon rule is based on Compact Fluorescent Light (CFL), which we commonly know as energy-saving bulbs.
However, now a days, we mostly use LEDs. You can select your light from the available options in the market for the best LED lights for aquarium plants. But select the one which have the options to control intensity (I will tell you the reason later).
Lets say you are a DIY kinda person and love to make your own lighting solution. I would suggest to use 5730 LED strips, if you are into strip LEDs, instead of 8520, as 8520 LED strips promote algae growth. Specifically Green Spot Algae.
Nonetheless, regardless of whatever LEDs you use, be it LED T5s, or LED Panel Lights or LED Strips, you should start with around 2.0-2.3 watt per gallon of light (Equivalent to 3.5 watt per gallon CFL). And 6 hours of light per day in one go.
For a new tank, you should maintain this light intensity and photo period for the first month. After that you should start to increase the photo period by 1 hour every week until you see algae growth, but never more than 10 hours.
I would recommend increasing the photo period to 8 hours, and then start to increase light intensity (watt) little by little every week, until you are satisfied with the plant growth. Please note that, lower light with longer photo period is much better than stronger light with shorter photo period.
The plants will only grow while there is light. If you do not provide enough photo period, the plants don’t have enough time in a day to actually grow. It is as simple as that.
Also note that, a tank that is 48L x 24W x 18H and a tank that is 36L x 24W x 24H are both 90 gallons – but obviously you can understand that their lighting requirements will never be the same as their heights are different. So, if you calculate the light wattage based on watt-per-gallon rule, and use the same wattage of light on both tanks as they are both 90g, the 48L tank will never have as much light as the 36L tank.
Finding The Balance And Harmony For Your Planted Tank
So, you can see, finding the perfect balance for your planted tank, is not really that hard –
- Step 1: Give max CO2;
- Step 2: Give max fertilizers; and finally
- Step 3: Find the right photo period/intensity of lights.
So basically, in this method, you only have to tune one thing – lights.
Let’s watch an excellent video about building a beautiful planted tank for beginners –
Additional Tips & Tricks
Below are some other additional bonus tips/tricks for a better and healthier planted tank:
Maintain a Healthy Amount of Plant Mass
Always have at least 70% area covered with plants. You are providing CO2, Ferts and lights for the whole tank. But if there is not enough plant mass in the tank, then there is nothing in the tank to consume them. And that’s when algae start to thrive. Having a good amount of healthy plants is the key to success against algae outbreak.
Introduce Some Cleanup Crew In Your Aquarium
You should always have some cleanup crew in the tank. Algae is part of a natural ecosystem and there is not a single planted tank in the world that does not have some algae. Our goal is not to eradicate algae, but to keep it under control, so that there are no “visible” algae in the tank.
And for this reason, you should have a good cleanup crew in your tank from the very beginning. There are no single algae-eater that will be enough for your tank, as different species eat different algae. I would recommend a mix of Amano shrimps, true SAEs (Siamese Algae Eater) and Oto for a planted tank. For a 20G tank, I would suggest a mix of 6 Amano shrimps, 4 SAE and 4 Oto. Again, there is no “rule” like this – it is just based on personal experience and research.
DO NOT OVERSTOCK YOUR TANK WITH FISH!
In a proper planted tank, plants are the number one priority. The fish are only there to accent the tank and to show signs of moving life in the tank. The more fish you have, the more waste they produce and it starts to build up in your tank. Eventually there is too much organic waste in the tank, and that promotes algae growth and poor health of the actual plants.
Maintain A Good Water Circulation
Always have a good water circulation. Filtration rate and circulation rate are different. Even if you are using a filter with 6x LPH, that may not necessarily mean you have enough flow in the tank, specially if you are using a HOB (Hang On Back Filter).
Flow in your tank is like blood in our bodies – it takes all the nutrients to the farthest corners of the tank so that plants can access them easily. 10-12x LPH flow is ideal for a planted tank. For this, I recommend using a powerhead or internal filter. A good option is the Sunsun JP Internal Filter. They are adjustable, they come with all the attachments to use it either as a power filter or just a powerhead, and you can just plug in the CO2 pipe to its venturi inlet and wont need to buy a diffuser.
Use Flourish Excel or Hydrogen Peroxide For Algae Control
If possible, use Seachem Flourish Excel in double the recommended dose in your tank. This is not as a carbon source but as a way of algae control.
Excel or any other s0-called “liquid CO2” does not actually provide a CO2 source for your plants, but the glutaraldehyde it contains is what prevents algae outbreak.
A cheaper and more accessible way is to use Hydrogen Peroxide (H2O2) in your tank. Before every water change, add 1.5-2 ml per gallon of H2O2 in the tank and wait for 15 minutes. Make sure there is flow in the tank so that the H2O2 can reach everywhere in the tank. If possible, add an extra powerhead to increase the flow for these 15 minutes. Then turn off the flow, do your maintenance in the tank and a 50-70% water change.
Wish You A Thriving Planted Tank
Maintaining a thriving planted tank is a never ending process. But with time and experience things will get easy for you. Keep an open mind, watch other aquarist’s works and try to learn from them. If you have any question or confusion please ask in the comment below. I would love to reply.
Happy fish keeping and aquascaping!
![7 Best Aquarium Thermometers: [With Most Accurate Reading]](https://expertaquarist.com/wp-content/uploads/2019/04/Best-Aquarium-Thermometer-768x576.jpg)
![Best Light for Aquarium Plants: [Reviews, Comparison & Buyer’s Guide]](https://expertaquarist.com/wp-content/uploads/2018/05/Best-Light-for-Aquarium-Plants-768x370.jpg)


![Our (Hand-Picked) 10 Best UV Sterilizer for Aquarium: [Reviews And Buyer’s Guide]](https://expertaquarist.com/wp-content/uploads/2019/04/Dutch-Style-768x354.jpg)