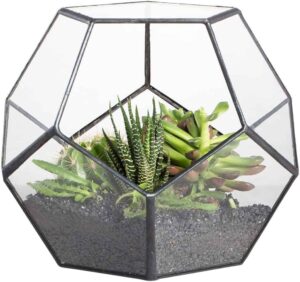
Terrariums are beautiful, and they make great gifts. Moreover, they are easy and quick to make and also maintaining them is easy. The glass globes used to make terrariums are also easily available and you can find them in almost every store that you go to.
Once you are done with creating one, you could perfectly hang it on your office desk, by the kitchen window or besides your bed. There is always that comfort that comes with looking at it everyday and watching the change in the growth of the plants inside.
If you are a lover of nature and would love to know how to make a simple DIY terrarium, you are at the right place. In step by step guide, we will clearly demonstrate to you how you can become the creator of a beautiful terrarium. Here are the procedures to follow.
Few Simple Steps To Make A Terrarium
1. Assembling the materials that you’ll need
The first step, obviously, lies in assembling all the materials that you’ll require in your construction. These materials are available and can be purchased in a local hardware or nursery store. Here is a list of the items that you’ll need to make a terrarium.
- Glass globe for housing the terrarium
- Activated charcoal
- Sand
- Mosses of various types
- Small sticks
- Well-draining soil
- Minerals and stones
- Air plant
- A string or hook for hanging it
- Spray bottle
2. Placing the sand layer in the terrarium
The bottom part of the terrarium is to be occupied by sand or pebbles for the purposes of draining. Sand is easier to acquire while pebbles will make the terrarium more beautiful. Get a small cup or funnel to load the pebbles or sand into the terrarium. You don’t require much amounts; one cup is enough.
3. Activated charcoal
The next layer into the terrarium is activated charcoal. Activated charcoal and activated carbon are the same thing- the stuff acquired from your fish tank filter. Activated charcoal can be bought online, or if you are unable to acquire some, feel free to skip this step. One quarter of a cup is enough. Activated charcoal is used to keep the items inside fresh. We recommend that you look for a simple cardboard to deliver the precisely into the terrarium as opposed to dumping them.
4. Adding a layer of soil
The next step is to add some layer of well drained soil. Two inches are enough. An example of well drained soil is a blend of succulent and potting soils. The terrarium plants will come with their own clump of soils, you therefore don’t require much. They will be able to survive on their own for some time. You could use a paintbrush to move and evenly position the soil. A good advantage to you if you’re using a large terrarium as this will be much easier.
5. Add large features to the terrarium
The next step is to add a plant or a succulent in the terrarium. Due to the different watering requirements of these two, it’s not advisable that you mix them. However, you could break the rule and include both of them in the same terrarium. We recommend that you place the plant at the back of the terrarium where it is more likely to receive adequate moisture. For the succulent, you can place it on top of a hill to facilitate quick draining. Placing it here also makes it closer to the opening which is more dry.
In order to have an easier time positioning the plants, we suggest that you place them prior to filling the soil. Place the plants then later back fill the remaining spaces with soil. If this doesn’t work for you, you can dig and plant in the normal way, which is also acceptable. Ensure that there is more space left as there are some small elements yet to be added.
6. Add small features to the terrarium
Small items can be difficult to place with your hands. To assist with this, you can opt to go with chop sticks or long tweezers. What small features can you add? Well, you are allowed to be creative and think outside the box. You aren’t limited to the things you can include. Examples of small features include stone eggs, mosses, colorful shells, cactus thorns and different minerals.
7. Maintaining the terrarium
Have a couple of accessories to complement your terrarium. If you’re making a glass terrarium that comes in the shape of a globe and that will be difficult to support, you will need iron hooks for support. On top of supporting them, they are really nice and pair up greatly with the terrarium.
Another thing is that you have to water your terrarium regularly; once or twice a week is enough. Maintaining a terrarium isn’t hard. All you need to do is to place it in a place that receives adequate sunlight, but if possible, shouldn’t be directly to the sun. water it from time to time and you’re good to go. If you’re planning to close your terrarium, open it at least once in a month to air it up. Pull off any yellow leaves or those that show signs of damaging. Be ready to prune the plants if they overgrow. To avoid overgrowth, do not fertilize your terrarium.
Additional Read: Vivarium Vs. Terrarium Vs. Paludarium
Final Words
Seven simple steps and you’re good to go with your terrarium. You’ll agree with me when I say that nothing is hard in the process. What’s even better is that the materials are readily and easily available. Beauty doesn’t need to be expensive and sophisticated, and making the terrarium has shown us that.
Follow the steps given above and you’ll be good to go. One thing that you should remember is that you aren’t limited to the things that you can add in your terrarium. You have the freedom of thinking outside the box. Be creative and decorate it in your best way possible. Place your terrarium in a nice place one you’re done and admire the work of your hands.


