In the Aquarium hobby Sump Filter is commonly considered as a Marine or Saltwater thing. But it is a great choice for Freshwater Aquariums as well, specially if you are thinking to go for a big tank!
A basic Freshwater Sump Filter can accommodate more filter media than any Canister Filter or Power Filter or HOB Filter.
Though we have a list of best aquarium filters in our blog but the thing is, a sump filter can outperform any of them if installed properly.
Why Should You Use a Freshwater Sump Filter
Very simply put, the more media you can use, the better your filtration will be. By filtration, we are referring to primarily biological filtration. A sump has the following main benefits:
- Very large area for filtration media
- Adds water volume to your overall system
- Fully customizable as per your requirement and choice of media
- No equipment in the main display tank so your fish tank looks clean
- You can even install a refugium inside the sump to grow moss or sensitive plants or shrimps

Planning Of A Freshwater Sump
1. Determine The Flow Rate For Your Sump
The flow rate of a sump should be around 6 times per hour than your tank size.
Let’s say your tank is a typical 4 feet aquarium, 48″x15″x24″. So your tank is about 75 Gallons (280 liters). So your return pump or flow rate through the sump should be around 450 Gallons per hour (~1700 liter per hour).
This way, your entire water in your tank will pass through the sump around 6 times every hour. Your sump and plumbing should be designed around the return pump flow rate (1,800 lph or 2,000 lph in this case, depending on available pump models).
2. What Should Be The Size of Your Sump
At a minimum, your sump should be 20% of your tank. If you have a 75 gallon tank, then your sump should be at least 15 gallon. But in reality, you should go for the biggest size that fits in your stand (remember, more water volume, more space for media, etc).
To properly calculate your sump size, you also have to consider how much water will drain to the tank when the return pump is turned off, or during electricity outage.
An easy way is to divide the gallon by the height of your tank! Our example tank is 75 gallons with a height of 24″. So we can assume that approximately 3 gallon water will drain to the tank. Just to be safe, because we don’t want water flooding our room, we will calculate double that amount, which is 6 gallons. So if you choose minimum 20% (15g) to be your sump size, then add 6g to it for a minimum sump size of 21g. If you want to have a 30% sump, then your sump size should be ~29g.
Just to clarify, I guess now you can get the part of adding water volume. Though your main tank is 75 gallon, your fishes in the main display tank are enjoying at least 96 gallons of water volume!
3. Finding Sump Dimensions
Now, lets consider our example tank. Lets assume it’s dimension is 48″x15″x24″ and having a typical stand. Approximate usable length inside the stand should be 42″, width 11.5″ and height 23″.
We need to measure the inside of our stand, because we are limited by it. There should be at least 6-8″ gap between the sump and the stand so that you can comfortably do maintenance in the sump.
So, in our example, your sump cannot be more than 21″ high. So theoretically, we can fit a 42″x11″x21″ sump inside the stand, which will be 42 gallons, which will be 56% of the main tank!
But you may not want to build the biggest size sump that can be stuffed inside the stand. So here, I will show you how to figure out the size for the minimum requirement of 26 gallon sump.
For this, one thing you have to keep in mind is that when pump is off and water drains down to the sump, we still want at least 1″ space left for safety reasons.
In this example, our sump’s width is restricted to 11″. For the sumps height, lets choose 18″. So if we leave 1″ of clearance, then maximum water height in sump is 17″.
In the tank volume calculator, now that the width (11″) and height (17″) is fixed, lets play around and find the length we need to have for 26g water volume. You will find that if you have length of 32″ then u have 25.9g. So in this case, we will make our sump 36″x11″x18″. This sump will hold ~29 gallon water, essentially adding around 35% water volume to the main tank.
Building The Sump: Freshwater Sump Setup (Step By Step)
1. Selecting The Right Pipes
Usually two drain pipes from the main tank to the sump is used. The first one being the primary drain and the other one being secondary drain.
The main drain takes most of the load and the secondary takes the rest. This also helps in case the primary drain gets clogged then the secondary can support your system.
Here are the typical flow rates (gravity drain) of different diameter of PVC pipes:
- 1/2″ pipe: 200gph (~750lph)
- 3/4″ pipe: 400gph (~1,500lph)
- 1″ pipe: 600gph (~2,200lph)
- 1.25″ pipe: 1,000gph (~3,800lph)
- 1.5″ pipe: 1,400gph (~5,300lph)
- 2″ pipe: 2,200gph (~8,300lph)
- 2.5″ pipe: 3,200gph (~12,000lph)
In this example of the 75 gallon tank, we will be running the sump at 450 gallon per hour. So 1″ PVC pipes would be good enough.
Also note that, there are two types of PVC pipes available in the market. One kind is used for electrical wiring (thinner walls) and the other is for water (thicker walls). We want to use the thicker pipes meant for water, and measure the inside diameter, not the outside diameter.

A PVC pipe for water that is having 1″ Outer Diameter is actually having 3/4″ inside diameter, and that is actually a 3/4″ pipe.
In this document, I will be mentioning all pipe sizes by their inside diameter, which is the correct way of saying.
So, when we use the 1″ PVC pipe for water, the inside diameter will be 1″ (outside around 1.3″). In all cases, it is always better to select double size for safety reasons.
Always consider what is the WORST thing that can happen and be prepared for that, so there wont be any mishaps. With two drain pipes of 1″ diameter each, we are ensuring 1,200gph overflow to the sump, which is not going to fail or malfunction.
That being said, it is also possible to use only one drain pipe, if u are willing to take the risk! In that case, you should use a 2″ PVC pipe to be safe. Over time, there will be gunk gathering inside of the pipes which will reduce the flow and you don’t want the pipe to be clogged!
As for the return pipe (from the return pump in the sump to the main tank), one 1” PVC pipe will be good enough as water is pushed through it and 1” PVC already has flow rate higher than our pump.
2. Drilling The Tank
You can drill your tank in the bottom, or the side, or the back, whichever is convenient for your sump filter setup.
Make sure that the glass is not tempered (you cannot drill tempered glass as it will shatter).
If you are going to use tempered glass, then buy normal glass, drill it first and then send for tempering.
Plumbing will be one way if you decide to drill the side or back glass, and another way if you drill the bottom.
In our case, we will focus on the side/back glass, because a proper bulkhead is not always available. And without that, it is not advised to drill the bottom.
Also, it is a common misconception that if you drill the bottom glass then there is chance of the bottom glass breaking. That is not true. Thousands of people have bottom drilled tanks around the world with no problem. The main reason is the stand. If it is not perfectly leveled, then the glass may break sometimes down the road.

In our example, we are using two 1″ overflow and one 1″ return. Take a look at this diagram. Here on the left are the two overflow/drain pipes and on the right side is the return pipe.
It does not matter what the horizontal (left to right) position is of the holes you drill. What is important is the vertical (top to bottom) position.
Here note the position of the primary and secondary drains. The Center of the Primary Drain is aligned with the bottom of the Secondary drain. This is very important to eliminate gargling noise due to air being sucked into the pipe due to water suction.
Estimated water level is going to be about 1/2” inch above your primary drain. Usually people want the tank’s water level 1” below, so position the holes accordingly.
As for the return, ideally we prefer to have it half way submerged, so that the return can create good surface agitation in the water surface. However, it totally depends on your own setup and requirement.
Just as a rule of thumb, it is advisable not to put the return totally submerged in water. Then it is hard for the pump to push the water from the pipe into the tank and the tank water will want to go down to the sump through the return pipe.
You can have the return fully over the water level also. We will get into more details of this when we go to the chapter on how to run your plumbing.
Note: Drilling the glass should be done by professionals only for safety reason.
Basic Freshwater Sump Design
A basic freshwater aquarium sump design consists of three main parts:
- Mechanical Filtration Chamber
- Biological Filtration Chamber and
- Return Chamber
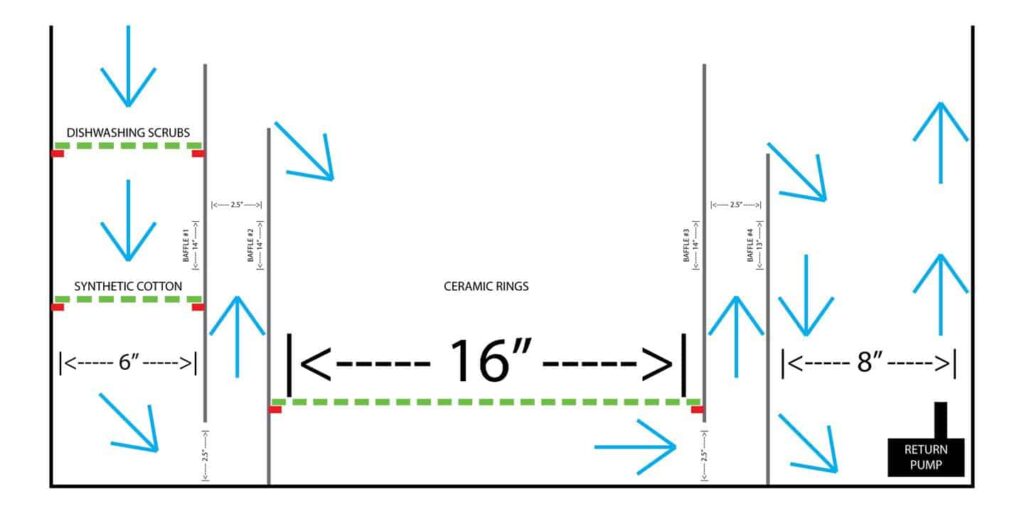
Here is our basic sump design for our 32” x 11” x 18” sump. Baffles #1,2 and 3 are all 14”. Baffle #4 is 13”. Note that, Baffle#1 and #3 are all 1” below the top. This is needed as safety, that in case on chamber is clogged for some reason, the water can still overflow to the next chamber and not flood into the room.
There is also 2.5” gap from the bottom for Baffle #1 and # 3. Here is how the sump will work. Water from the tank with overflow and come down the drain pipes to the mechanical filtration chamber.
Now let’s discuss the 3 main parts and what media to put in freshwater sump –
1. Mechanical Filtration Chamber
Here first we will have common dish-washing scrubbers (available in local departmental stores). Then we will have synthetic cotton. I have used two different media for mechanical filtration because, the dish washing scrubbers will filter coarse particles and the synthetic cotton will filter fine particles from the water.
The scrubbers are reusable and a gentle rinse during maintenance is all it needs. The synthetic cotton is very cheap. As it is very cheap media, its better to just throw out old one and put new in the sump. If you want you can rinse and clean the cotton and reuse it – up to you.
2. Biological Filtration Chamber
After mechanical filtration, the water will go through the first set of baffles into the biological filtration chamber. This chamber should be filled with as much ceramic rings as it can hold. I prefer ceramic rings over bio balls because ceramic rings have more surface area than bio balls so they can host much more bacteria.
Secondly, ceramic rings are easier to clean. During maintenance, a very gentle rinse in the old tank water is good enough to clean it. Bio balls need more shake to clean them, so chances are you will be washing off some beneficial bacteria as well.
I should explain the small red lines and the green dotted lines in the design now. Basically, the red lines are small strips of glass attached along the width of the sump (front to back) on the sides so it can hold something like a tray on it. Lets call them holders.
The green dotted lines are strips of glass placed on top of the “holders” in a left to right manner to make the media stay up from the bottom of the sump. Basically we are creating a tray-like thing so that it can hold the media up and also lets the water pass through. Below are some pictures illustrating this:

In the above pic you can see the two sets of “holders” created to hold the tray on which the media will stay. These strips run from the front to back of the sump.
Now if we cut 1” strips of glass and put in on these holders from left to right, with 1” gap between each strip, we can have a tray-like thing to hold the media but also allow water to freely pass through.
Here is a diagram of the holder and tray setup in top view:

Alternatively, instead of using glass strips to make the tray (green ones in the diagram), you can cut and use plastic paper trays available at stationary shops. These look like this:

Just remember, our goal is to hold the media while letting water flow freely. Ideally, “egg crates” are used. If you use some sort of tray-like mechanism to lift the biological media up from the bottom of the sump, then debris will not accumulate in the biological chamber.
Any debris or dead bacteria will just pass through to the main tank and then be captured by your mechanical filter.
If the flow of the biological chamber is designed like the diagram, you will not have to do much maintenance on your sump as it will remain clean for longer time.
3. Return Chamber
Now, lets go back to how our sump works. After the water passes through the ceramic rings, it is biologically filtered and ready to go back to your tank.
So, the water passes through the last baffle to enter the return chamber. This is where your return pump is. If you have a heater, this goes in this chamber as well.
Please take another look at the diagram of the sump. It is very important for the water to pass through the media.
Notice that, the water is diverted upwards after it passes mechanical filtration (top-left side of the biological filtration chamber) and then forced to go downwards (bottom-right side of the biological filtration chamber).
This is crucial! If the water just passed over the biological filtration chamber, it is not actually getting filtered, as water will always take the path with less resistance.
Lastly, the last baffle is different for freshwater and marine. Here we are making the water fall from top to the return chamber. This helps oxygenating the water before we send it back to the pump.
In marine sump, the water should be directed to the return chamber from the bottom so that air bubbles are not sent into the main tank. So be very careful with this.
Another thing to look out for is that you should have at least 2.5” gap between the baffles, so that you can get your hand in that gap and clean when necessary. If gap is too less then you cannot clean there if needed, or will be difficult.
If you need to add activated carbon for chemical filtration, you can simply put it in between baffled 3 & 4 and the water will be chemically filtered before going to the return chamber. When not needed, you can simply take it out of there.
Finishing Your Sump: Plumbing
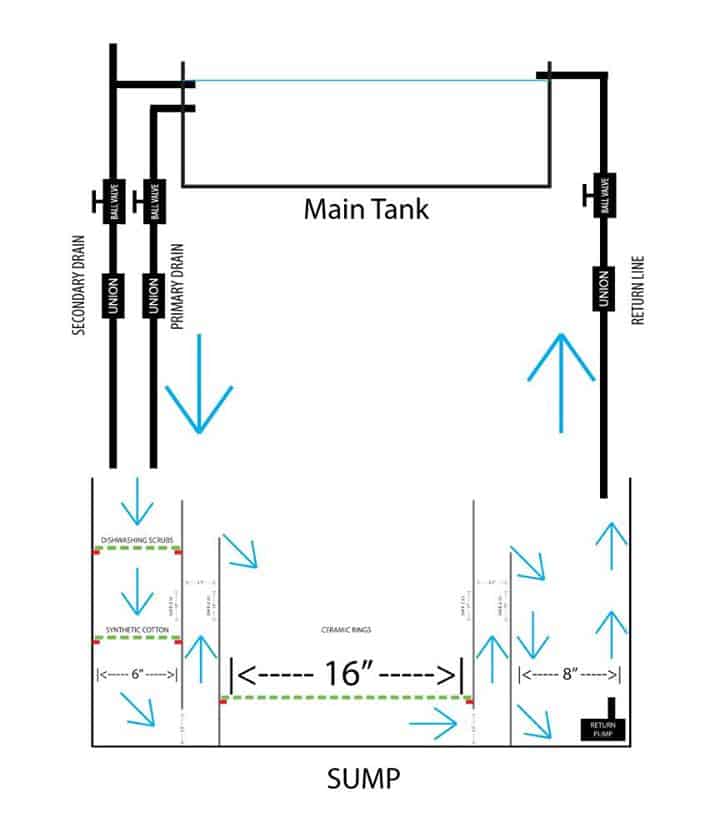
Now that the sump is made, we need to plumb it to our main tank. Here is a basic diagram of how we are going to plumb it:
Before we get into plumbing, please take a note of the common PVC fittings that we will be using in the following picture. Note that, as we are using 1” pipe, all fittings will also be 1”. I have all fittings marked (A/B/C/D/E/F/G/H) for your reference.

In the holes that we have drilled in the tank, we need to connect and silicone the PVC adapters. The Male adapter (A) goes inside the tank while the Female adapter (B) goes on the outside. Then just screw them together tightly and use plenty of silicone to seal the adapters with the glass. On the Male Adapters (A) inside the tank for the drain pipes, you can add Elbows (C) and add nets to prevent fish and food from getting sucked into the sump.

Now, for the primary drain, first connect an Elbow (C) to the other end of the Female Adapter (B) to get the flow downwards; then connect a Ball Valve (E) and then an Union (D) and then take the pipe to the sump’s mechanical filtration chamber. As simple as that!
For the secondary, it is a little bit tricky. We will make a Durso pipe here for a very silent overflow. To make the Durso pipe, on the other end of the Female Adapter (B) of the secondary drain, connect a Tee (F). Cap the top with End Cap (G) and drill a small hole there for air flow. This part needs to be above the water level of your tank, so if needed, add small piece of pvc pipe to raise the height. Then on the other end of the Tee, connect a Ball Valve (E) and then an Union (D) and then take the pipe to the sump’s mechanical filtration chamber, just like the primary drain.

Lastly, for the return, connect and Elbow (C) on the outside of the tank to the Female adapter, then use a Ball Valve (E) and then an Union (D) and take the pipe to the return chamber of the sump. It is a good idea to use a small piece of flexible pipe to connect the return pump to the PVC pipe. This way, you will not transfer any vibration off the return pump up to your main tank.
Now how to make the plumbing work?
As you start to add water in the tank and the tank water rises enough, it will start overflowing through the primary drain.
Adjust the ball valve on the primary drain to reduce its flow, so the water level will continue to rise and start to overflow through the secondary drain or the Durso pipe. Now adjust the ball valves to control the flow, so that the overflow is virtually silent.
You may need to add water to the sump so that the return chamber doesn’t run dry or too low. Just fiddle around with the ball valves on the drain pipes and you will have a perfectly flowing overflow which is also silent!
The ball valve on the return pipe should be fully open, and you can close that when you shut off the pump so that the tank’s water does not overflow through the return pipe.
Another option is to use a PVC Check Valve in the return pipe so that you don’t have to manually turn off the return line when pump is off!
Always mock up your PVC fittings and test fit them first. Once you are certain that everything is okay, use PVC Cement (H) to securely cement all PVC parts that are outside of the main tank.
Once you have cemented the joints, you cant take them off. Only way to remove them is to cut it off and replace the fittings. That is why we are using the unions so we can disconnect if needed.
Let’s watch a great video about DIY Fresh Water Sump Filter from our favorite “The King of DIY” –
Last Words
Well, that’s all on a basic freshwater sump filter! Happy fish-keeping and feel free to ask any questions in the comments below.