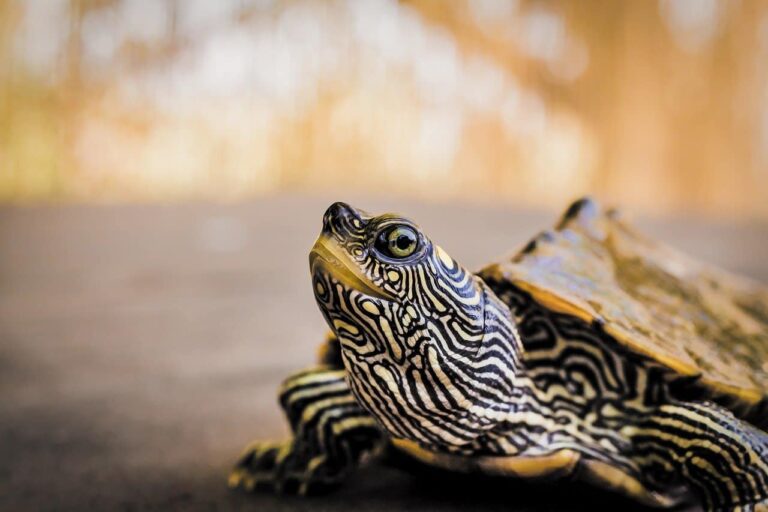
When I first started keeping turtle at home, I was excited. And my excitement touched heaven when I found one of my female pet turtles had laid some eggs. To be honest, I didn’t even have a hint that she is going to lay an egg.
Anyway, I went on further and tried to take care of the eggs until they hatched. Unfortunately, I couldn’t save even one of those eggs. It was pathetic for me. So, I immediately started researching how to take care of a turtle egg.
And happiness came only after my extensive research and expert opinion. The next time, my lovely pet turtle had laid seven eggs, and I was able to hatch six turtle babies. So, it was an impressive result for me.
I think that the results I found during my research will be useful for beginner turtle keepers. The discussion will include proper steps to take care of the pet turtle, preparing the incubator and moving technique of the egg and newly bred turtle babies.
How to Know When Turtle Will Lay Egg?
 The first step of taking care of turtle egg will start with the understanding of when the female will lay eggs. There are a few considerable signs that you can observe and know the egg-laying time of the female turtle. These signs include:
- During the time of laying eggs, the female will mostly be on the land than on the water. It is because she will try to find the safest and best possible location to lay the eggs securely. Mostly, she will be in the lookout for a sandy area where she can lay eggs and hide them under the sand.
- Once she finds the right location, she will use his front legs to dig a hole in the spot promptly. After the initial stage, she will use his hinge legs to complete the digging process.
- The turtle will dig the hole as deep as her entire body length. She will enter the spot and wait with patience until laying the eggs.
- Lastly, the walking pattern of the female turtle changes during the egg giving period.
Once the female lays the eggs, she will cover the hole with sand and leave. So, it would be best if you were always on the lookout to find the spot where the pet turtle has laid her eggs.
What Do You Do After Finding the Turtle Eggs?
After a successful search mission, you have finally found the turtle’s egg on a sandy hole within the enclosure. So what do you do with them?
Firstly, you can keep the eggs on the hole and let nature take care of them. It means you can allow the natural process for egg incubation and hatching. However, depending on the birth process is not a wise option.
Often, the majority of the eggs won’t make out to the hatching stage. Also, some hatched babies won’t be able to survive even after a few hours. These happen because:
- Continuous shifts in weather
- Inappropriate temperature for the egg hatching
- Rains and coldness (if it is an open enclosure)
All these causes are possible since the incubation period will usually be between 60 days to 90 days. And during this long period, anything can happen.
So, I suggest you take responsibility for the entire incubation period in your hand. And it’s worth the job when you will see those little and cute baby turtles walking around your turtle enclosure happily.
How to Take Care of a Turtle Egg
Once you decide to take the turtle egg incubation responsibility in your hand, the actual task will begin for you. First off, I recommend you to promise yourself that you be patient during these entire 60 to 90 days incubation period.
Your patience is necessary since, throughout the incubation period, you will have to measure the temperature of the incubating spot and take actions on different conditions. However, the initial three tips of turtle egg caring include:
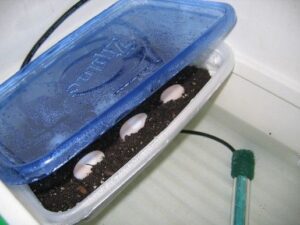
- You need to place the eggs in a safe place. You can do it easily with a container and vermiculite. Vermiculite is widely used in gardening and is a popular incubation media. When you purchase the box, make sure it has a lid. Also, a bag of vermiculite will serve you for at least a couple of years.
- Now, you will require mixing the vermiculite and water in an equal amount. However, when you measure the vermiculite and water, don’t go with the volume since it will give wrong readings. So, measure the weight of the vermiculite and water. Then mix them in the pot so that the vermiculite is wet, but water doesn’t drip when you press the mixture. However, when you create the blend, leave a few inches on the top of the container.
- On the empty space, you will need to place the eggs from the sandy hole. Nonetheless, when you move the eggs on the pot for incubation, you need to extra careful.
In the next descriptive section, we will discuss how to move the turtle egg from the original location to the incubation container.
The technique of Moving the Turtle Eggs on the Incubator
 Turtle eggs are susceptible and need extreme care while handling. It is crucial since any improper handling of the eggs will destroy the embryos.
The embryo of the turtle is attached to the egg top during the development. When you move the egg, don’t think of an upside-down the egg. If you move the egg upside down, the embryo will get hurt. And when it happens, the hatchlings won’t come out from the egg.
So, it is a must that you keep the top on the upright position as you move it from the original hole to the incubator.
Are you worried about the moving procedure?
Well, getting worried is natural. But we have marked up a perfect solution to the problem. Use a marker or pencil to effectively mark the top of the egg. Once appropriately marked, you are all set to place them on the incubator.
However, make a deep impression of the vermiculite mixture so that about two-thirds of the egg is buried underneath. And the rest one-third of the egg should be left open to receive air. Once you have correctly placed the eggs on the pot, it is time to move on to the incubation process.
Taking Care of the Incubation Process
In the incubation pot, the egg will stay around 60 days before the hatchling. And during the incubation period, you will need to take care of the eggs regularly. But the good news is that the caring process is pretty straightforward and won’t have to perform it daily either.
If you wish, you can quickly place the container in a secured position with the lid tightly fitted. Once you keep the top tight and the pot safe, the summer temperature will show its magic. The natural warmth created inside will initiate the incubation process.
However, we recommend you to use a professional incubator and place the pot on it for a secured and risk-free incubation. Once you put the eggs on the incubator, don’t move them until the hatching is adequately completed.
However, once a week, you need to open the incubator lid and check the eggs. You will require preventing molds’ growth. If there are any signs of any mold growth, you can use a soft bristle brush to wipe off the mold gently.
Also, check for any deterioration on the eggshell. But the ardent good news is that if kept in the proper state, the eggs won’t deteriorate sooner.
There are two types of incubation processes when it comes to turtle eggs. These methods have been developed since the incubation temperature actually controls the turtle gender. In higher temperatures,there will be more female babies, and at lower temperatures, there will be more male turtles.
And so, the two incubation processes are typically focused on the temperature. The processes are:
- Low-humidity method: Terrestrial turtles and tortoises from dry regions will incubate eggs in this method.
- High-humid method: The eggs of the box turtle and other aquatic turtles are incubated in the high-humid process.
Now that you ardently know the ins and outs of the incubation method, it’s time to choose a correct incubator for the eggs. You can purchase a good-quality reptile incubator for the purpose. And if you don’t want to buy a professional incubator, you can actually make one by a simple DIY project.
The DIY and Homemade Turtle Incubator Project
I have already mentioned that you can simply prepare a quality incubator at home.
Things you will need:
- One Styrofoam cooler
- One water heater
- A clean piece of mesh
- Glue
- A solid piece of plastic
- One water thermometer
The steps include:
- On the Styrofoam cooler, cut out a circle using a sharp knife to enter the water heater throw it. The ring should be large enough to accommodate the heater.
- After you have left out the plug of the heater outside, fill up the circle using the mesh cloth. Use glue to attach the piece of mesh around the loop properly. It is vital because you don’t want to allow anything to enter the incubator.
- After that, fill up the empty space of the Styrofoam cooler with a piece of plastic. It will keep the incubator tight and support the container holding eggs. So, the egg pot won’t move and causing harm to the embryos.
- Add clean water in the cooler. Its level should remain lower than the lately added plastic.
- Finally, place the thermometer in the cooler. The use of the thermometer is to observe the water temperature continuously. However, you can leave away the thermometer and check the temperature daily with a regular one.
Once the incubator is ready, carefully place the egg container on it. Now it is all about the waiting game.
Precautions during the incubation process:
- You should never change the orientation of the eggs during the incubation period.
- The temperature within the incubator should always remain at 25°C-27°C or 75°f to 80°F.
- The humidity level needs to be always 75% to 80%.
Wait Until the Hatchling Starts Coming Out
Although various turtles species may have a slightly different incubation period, it will be roundabout 50 days to 60 days. But the temperature variation may affect the incubation period. For instance, an increase or decrease of about 2°C temperatures will reduce or enhance the hatching period for around three weeks.
If all things go well, the new babies will start breaking down the eggshell and tasting the first earth. However, when you see the babies coming out of the shell, don’t get over-excited. Also, don’t pick the babies thoroughly out of the cover.
Although the shell is broken, some parts may still be attached to the babies’ belly. It is called the egg sac and will be connected underneath the belly.
So, allow the turtle babies for a few hours so that the newborn can fully detach it from the shell. Then carefully pick the newborns and keep them in another container. But don’t forget to ardently put a towel in the box before moving the turtles in it.
The baby turtles will stay in the container for a week and familiarize with the surrounding. The egg sac attached to their underbellies will provide them the required nutrition.
Some Importation Information About Turtle Egg and Hatching
- A red-eared slider egg will hatch in around 72 days. It generally takes place during the August to September session.
- Box turtles have different hatching times depending on the location. In the northern hemisphere, the hatching takes 90-120 days, and in the southern hemisphere, it takes about 70 days.
- Turtle eggs are incapable of hatching in the water. Even a slight submerging in the water will destroy the embryo and make it infertile.
- In the female turtle, underneath their tail, there is an opening vent named cloaca. The eggs will come through the cloaca.
- In the wild, many predators live on the turtle egg. However, at home, the eggs are free from the risk of being eaten. Yet, if you have dogs or cats at home, make sure they don’t reach the turtle egg incubator.
The Bottom Line
This was our in-depth and prompt discussion on how to take care of a turtle egg from the first time the turtle lays them to the hatching period. However, your duty isn’t finished yet.
Nourish the newborn babies in a separate container and ensure that the egg sac isn’t broken. The egg sac supplies nutrition to the babies for about a week. So, if it gets damaged, the baby may die due to infections.